For this post, I will specifically be focusing on choosing an acoustic guitar. In particular, I will be going through the different criteria I use when choosing an acoustic guitar. The 4 main criteria I use are "Feel", "Sound", "Quality" and "Price". I'll go into detail what these mean.
Feel
-----
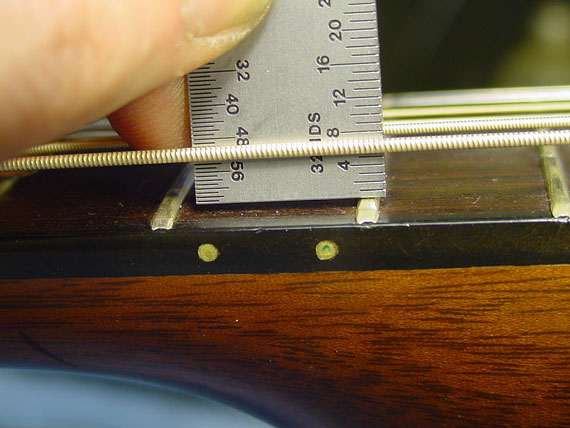
When testing out guitars at the shop, one of the criteria I use is the "Feel" factor. What this means is that when I play a guitar, I ask myself, "how does the guitar feel to my fingers?" This is important to me because when I play my guitar, I want it to feel good on my fingers. An example would be whether the action of the guitar is too high. If so, it would hurt your fingers more than if the guitar had a lower action. "Action" refers to how far the string is from the fretboard. A higher action means that the string is further away from the fretboard, therefore, to play a note, you would have to press down harder on the string. Below is a picture of a guitar with high and a guitar with low action for you to compare.Of course, it is totally up to you what kind of action you want. The main criteria is that it feels good when you play it.
Sound
------
The next criteria I use is the "Sound" factor. This of course is quite subjective because different people like different sounds. My advice to you is to buy a guitar based on what kind of sound you like. For example, do you like a more mellow or bright sound? Do you like a guitar with a softer or louder projection? In the end, it's really up to you because remember, this is your guitar that you'll be using. Make sure it is a guitar you will enjoy playing.
Quality
-------
The next criteria would be the "Quality" factor. I sometimes couple this factor together with the brand of the guitar because if the brand is a famous/reliable one, then you can be sure that their quality is just as good too. Of course, the more famous brands will come with a greater price tag. Therefore, before choosing the brand of your guitar, do some research. You'll be amazed at how much information you can find over the internet. Guitar forums are an excellent place to read up on reviews about different guitars.
Price
-----
Finally, the "Price" factor plays an important role too. If you are a beginner, I would strongly suggest getting a guitar that isn't too expensive. The reason is because if you buy a high-end guitar when you are still a beginner, you would not really be able to maximize its potential. But by all means, if you want to buy a high-end guitar, go ahead. Just remember that what matters is that you like playing the guitar you buy. An expensive guitar does not equal to a guitar you will enjoy playing. The criteria I mentioned above will ensure that you will enjoy playing your guitar.
This is a site I created to complement my brother's blog, which is about learning Christian songs on the guitar. This blog is perfect for you if you are a total beginner.
30 January, 2009
20 January, 2009
HOW TO... tune your guitar using the 5th fret method
This is probably one of the most common methods to tune your guitar. I call it the "5th fret method", don't know if there's a proper name to it though. With the help of the diagram below, I'll attempt to explain how to tune your guitar using this method as clearly possible.
What you see above might look a little confusing at first, but let me explain what it represents. At the right hand side, you see the numbers from 1-6 in red. These represents the 6 strings of your guitar. The 1st string (thinnest) is right at the bottom, and the 6th string (thickest) is at the top.
On the top, you see numbers from 1-5 in red. These numbers represents the frets of your guitar. You know the metal bars that runs vertically across your guitar board? Yup, those are the frets.
Lastly, circles with letters inside represents the notes if you were to place your fingers there. At the Nut (the white vertical bar that you can find on your guitar before the first fret) you don't have to place your fingers on it, just play it free-string.
Okay, let's start tuning the guitar.
1st string - Start off with the 1st string which is an E note. We have to assume that your 1st string is tuned to an E note (you can do this by using a piano etc)
2nd string - To tune the 2nd string, what you have to do is place your finger on the 5th fret of the 2nd string. This will give you an E note as well. So what you have to do now is to tune the 2nd string so that it sounds like the free string of the 1st string (E note).
3rd string - After you've tuned your second string, move on to the 3rd. Place your finger on the 4th fret of the 3rd string. Now, tune your 3rd string so it sounds like the free-string of the 2nd string (B note).
And so on... All the way till you reach the 6th string. There you go, your guitar is now tuned.
Note: Remember, for this to method to work, it depends on tuning your 1st string. Make sure it's tuned to an E, because you would want to use your guitar to play with other instruments. And if everyone's E is different, it will sound terrible when played together
03 January, 2009
HOW TO... Read Guitar Tabs
This post shall be in relation to my brother's tabs which can be found on his website at http://grahamchoo.blogspot.com
As you all should know, my brother posts guitar tabs on his blog on the videos that I have posted up on Youtube. I shall attempt to teach those who do not know how to read tabs, to be able to read the tabs he posts.
Above is a tab that you can commonly find on my brother's blog. Notice that it is vertical. At the sides, there is e B G D A E. This corresponds to the strings on your guitar. "e" represents the 1st string, followed by B (2nd string) and so on. When you see the numbers in a vertical fashion, this means you strum the chord. In this case, it is a F# chord (notice the note written on top). This is how you read the tabs: 1st string (e) 2nd fret, 2nd string (B) 2nd fret, 3rd string (G) 3rd fret, 4th string (D) 4th fret, 5th string (A) 4th fret, and 6th string (E) 2nd fret.
Sometimes you will also come across tabs like these. Notice the "/" and the "h" and the "p". A lot of people have asked what these symbols mean. In short, CHECK THE LEGEND, it's at the bottom of the whole tabs, and it looks like this:
As you all should know, my brother posts guitar tabs on his blog on the videos that I have posted up on Youtube. I shall attempt to teach those who do not know how to read tabs, to be able to read the tabs he posts.
F#
e|---2---|
B|---2---|
G|---3---|
D|---4---|
A|---4---|
E|---2---|
Em A Bm F#Next, you notice that sometimes you will encounter these kind of tabs. It looks slightly more complicated, but in actual fact, it's pretty simple to read. All you have to do is to read from left to right. In this case, since the numbers are not in a vertical fashion, it means you have to pluck each individual string from left to right. So, the first chord is an Em. Pluck 6th string (E) free string, 4th strong (D) 2nd fret, 3rd string (G) free string, 2nd string (B) free string, and 1st string (e) free string, and continue according to what you read. Yes, it's that simple.
e|---------0---------------0---------------2---------------2-------2-|
B|-------0---0-----------2---2-----------3---3-----------2---2-----2-|
G|-----0-------0-------2-------2-------4-------4-------3-------3---3-|
D|---2-----------2---2-----------2---4-----------4---4-----------4-4-|
A|-----------------0---------------2-------------------------------4-|
E|-0-----------------------------------------------2---------------2-|
e|-------------------------------5-5/7-7/9-7-6-----------------------|
B|-----2-3-5p3-5/7-5/7-5-3h5p3-2---------------7/8-7-5h7p5-3h5p3-2---|
G|-2/4---------------------------------------------------------------|
D|-------------------------------------------------------------------|
A|-------------------------------------------------------------------|
E|-------------------------------------------------------------------|
| / slide upI hope this post has made it clear on how to read my brother's tabs. Enjoy learning the songs :)
| \ slide down
| h hammer-on
| p pull-off
| ~ vibrato
| + harmonic
| x Mute note
Subscribe to:
Posts (Atom)